telecaster string guide
Explore the essential guide to Telecaster strings, covering their history, setup, and impact on playability. Learn how proper string configuration enhances tone and performance.
1.1 Importance of Proper String Setup
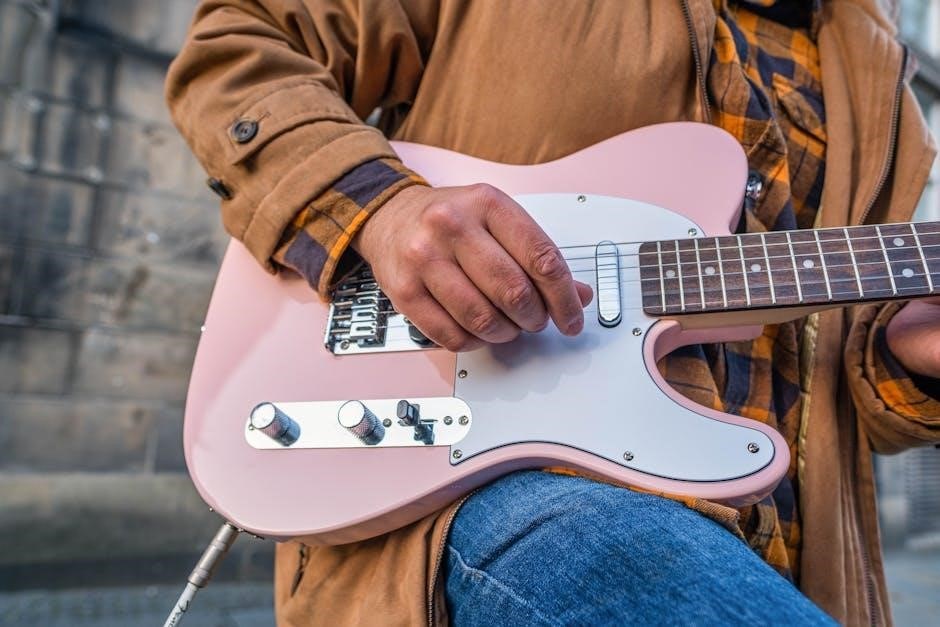
Proper string setup is crucial for optimal playability and tone on a Telecaster. Incorrect string routing or tension can lead to tuning instability and poor intonation. Ensuring strings are stretched and tuned correctly minimizes buzz and enhances sustain. A well-configured setup also prevents unnecessary wear on the guitar’s components, such as the bridge and tuning machines. Additionally, proper string setup allows for smoother playing experience, reducing fatigue during performances. Many players emphasize the importance of using the correct gauge and material for their playing style. Neglecting these steps can result in a subpar sound and playing feel, making proper setup a cornerstone of guitar maintenance and performance.
1.2 Brief History of Telecaster Strings
The Telecaster’s string setup has evolved significantly since its introduction in the early 1950s. Originally designed with a string retainer placed between the D and G tuners, the design later shifted to align with the A tuner for better tuning stability. Vintage Fender strings were known for their clarity and durability, with players often opting for lighter gauges like 0.009 for ease of playability. Over the years, the development of various string materials and winding types has expanded tonal possibilities. The early 50s Teles featured a unique string guide that remains popular among enthusiasts for its aesthetics and functionality; Today, players continue to experiment with gauges and materials to suit their playing styles, while maintaining the classic Telecaster sound.
Understanding Telecaster String Components
The Telecaster’s string components include the string tree, bridge, and tuning machines. These elements work together to ensure proper string alignment, tuning stability, and optimal playability.
2.1 The Role of the String Tree
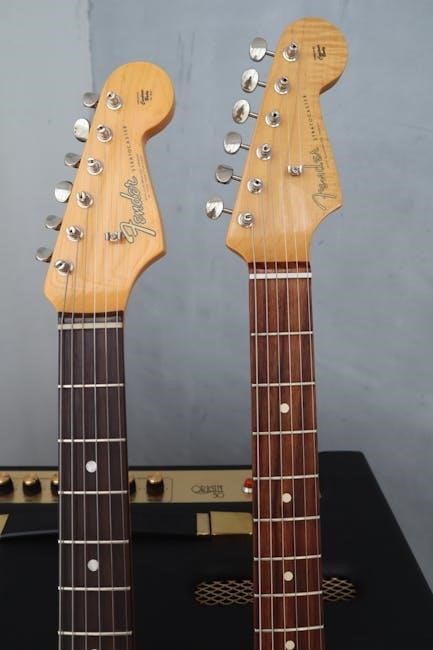
The string tree plays a crucial role in maintaining proper string alignment and tuning stability on a Telecaster. Historically, early 50s Telecasters positioned the string retainer between the D and G tuners, closer to the G tuner, but it was later moved in line with the A tuner for better functionality. This small component ensures that strings are evenly spaced and properly angled, preventing issues like tuning instability or uneven playability. Many players consider the vintage Fender String Guide (Tree) to be the most visually appealing and easiest to install. A simple test involves popping the strings out from under the tree and retuning to assess any tonal differences. Properly installed, the string tree enhances both the guitar’s functionality and its classic aesthetic appeal.
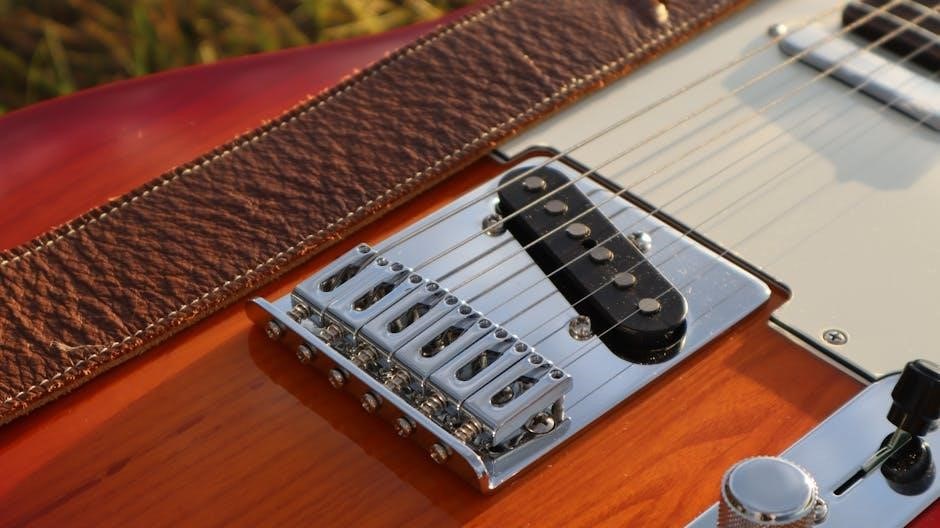
2.2 Bridge Setup and String Routing
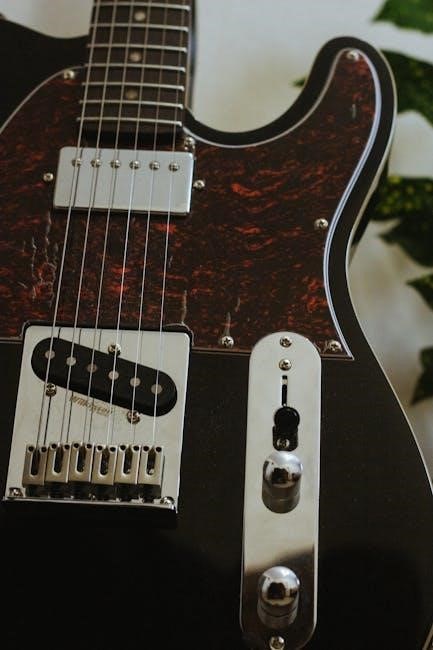
The Telecaster bridge setup and string routing significantly impact the guitar’s tone, sustain, and playability. The Telecaster typically features a fixed bridge with three saddles, allowing for precise intonation adjustments. String routing options include through-body or top-load configurations, each affecting the instrument’s resonance and tuning stability. Through-body routing enhances sustain and is standard on most Telecasters, while top-load setups offer easier string changes. Proper string routing ensures even tension distribution across the bridge, preventing tuning issues and buzzing. Players often debate the sonic differences between these configurations, with through-body routing generally preferred for its rich, full tone. Correct bridge setup and string routing are vital for achieving optimal performance and maintaining the Telecaster’s signature sound.
2.3 Tuning Machines and Their Impact
Tuning machines, or tuners, play a crucial role in maintaining precise tuning and stability on a Telecaster. High-quality tuners ensure smooth, accurate pitch adjustments, while low-quality ones can lead to tuning inconsistencies. Telecasters typically feature either open-gear or sealed tuners, with sealed tuners offering better protection against dust and corrosion; The gear ratio of the tuners affects how easily and finely players can adjust string pitch. Upgrading to premium tuners can significantly improve tuning stability, especially for players who use alternate tunings or bend strings frequently. Properly functioning tuners are essential for reliable performance, making them a vital component of the Telecaster’s setup and playability.
Choosing the Right Strings for Your Telecaster
Selecting the ideal strings for your Telecaster involves considering your playing style, musical genre, and desired tone. Factors like string gauge, material, and winding type significantly impact playability and sound quality, ensuring the best performance for your needs.
3.1 String Gauge Options
String gauge refers to the thickness of the strings, measured in thousandths of an inch. Telecasters typically use gauges ranging from 0.009 to 0.042 (light) up to 0.011 to 0.052 (heavy). Lighter gauges (0.009–0.042) offer easier playability and brighter tones, while heavier gauges (0.010–0.046 or higher) provide better sustain and a warmer, fuller sound. Medium gauges (0.010–0.046) strike a balance, making them a popular choice for versatile players. The right gauge depends on your playing style—lighter for bending and lead work, heavier for rhythm and chunky tones. Experimenting with different gauges helps tailor your Telecaster’s feel and sound to your musical needs, ensuring optimal performance and comfort. Always consider string tension and how it interacts with your instrument’s setup when selecting a gauge.
3.2 String Material Types
Telecaster strings are available in various materials, each offering distinct tonal and playing characteristics. Nickel-wound strings are the most common, providing a warm, balanced tone with a smooth feel. Stainless steel strings deliver a bright, crisp sound and are highly durable but can feel stiffer. Flatwound strings have a smooth surface, reducing finger noise and offering a mellow, vintage tone. Coated strings, like Elixir’s Optiweb, are treated with a thin layer to resist corrosion and extend life. Other materials include chrome and titanium, offering unique tonal profiles. Choosing the right material depends on your desired tone and playing style, as each material impacts both sound quality and feel. Experimenting with different types helps find the perfect match for your Telecaster.
3.3 Winding Types and Their Effects
Telecaster strings are wound in different ways, each affecting tone and playability. Roundwound strings are the most common, featuring a rounded wire wrapped around the core, producing a bright, full tone with a smooth feel. Flatwound strings have a flat wire wrap, resulting in a smooth surface that reduces finger noise and offers a mellow, vintage tone. Halfwound strings combine elements of both, providing a balance between brightness and smoothness. Tapewound strings use a flat tape instead of wire, delivering a warm, mellow sound with minimal fret noise. Each winding type caters to different playing styles and musical genres, allowing players to customize their sound and playing experience. Experimenting with these types helps musicians find their ideal tone and feel.
Step-by-Step String Installation Guide
The Telecaster string installation process involves removing old strings, fitting new ones, tuning, and stretching. Ensure proper setup for optimal playability and tone consistency always.
4.1 Removing Old Strings
Start by loosening the old strings using a tuner to release tension; Detune each string completely before cutting or unwinding. Use wire cutters to remove strings at the bridge and tuning machines. Carefully pull out the string ends from both ends, ensuring no remnants are left. Clean the bridge, tuners, and fretboard to prepare for new strings. Properly dispose of old strings to avoid environmental harm. Inspect the bridge and nut for wear or debris, addressing any issues before installation. This step ensures a fresh start for optimal performance and tone with the new strings. Always handle the guitar gently during this process to avoid damage.
4.2 Installing New Strings
Begin by unwinding the new string and cutting the excess at the ball end. Thread the string through the bridge, ensuring proper routing according to your Telecaster’s design. Secure the string at the bridge, leaving a small amount of slack. Next, thread the other end through the tuning machine, winding it clockwise. Leave about 1/8 inch of string beyond the tuning post. Wind the string neatly, avoiding overlaps, and maintain a slight upward angle for the low E string. Repeat for all strings, ensuring each is seated correctly in the nut. After installation, stretch each string gently and tune to pitch. This ensures stability and proper playability. Inspect all strings to confirm they are properly seated and aligned.
4.3 Stretching and Tuning
After installing new strings, stretching is essential to stabilize tuning and prevent slippage. Hold the guitar vertically and gently pull each string away from the fretboard, starting at the 12th fret. Repeat this process several times, then tune the string. This ensures the string settles properly. Use a tuner for accuracy, starting with the low E string and moving up. Tune each string to standard pitch (EADGBE) or your preferred alternative tuning. After tuning, play chords and bends to check stability. Re-tune as needed, as new strings may require adjustment. Stretching and tuning are critical steps for optimal playability and consistent performance. Properly stretched strings will stay in tune longer, enhancing your overall playing experience.
Common Mistakes to Avoid
Incorrect string routing, over-tightening, and neglecting string stretching are common errors. These mistakes can lead to tuning instability, string breakage, and poor playability. Be cautious and methodical.
5.1 Incorrect String Routing
Incorrect string routing is a frequent mistake that can significantly affect playability and tone. On a Telecaster, strings must be properly threaded through the bridge and nut. Misrouting can cause uneven string tension, leading to tuning instability and poor intonation. For example, the low E string should pass through the bridge saddle from the bottom, while the high E string should go through the top. Using the wrong path can disrupt the guitar’s balance. To avoid this, follow the manufacturer’s routing guidelines or consult a setup guide. Proper routing ensures even string alignment and optimal performance. Always double-check the routing before tightening the strings.
5.2 Over-Tightening Strings
Over-tightening strings is a common error that can cause significant issues. When strings are tightened beyond their optimal tension, they can stretch unevenly, leading to tuning instability. Excessive tension may also result in higher action (string height), making the guitar harder to play. Additionally, over-tightening can put undue stress on the neck, potentially causing warping or damage to the tuning machines. To avoid this, tune strings gradually, checking pitch frequently. Stop tightening once the desired note is reached. Using a tuner can help ensure accuracy; Over-tightening not only affects playability but can also shorten the lifespan of the strings and harm the guitar’s setup. Always aim for a balanced tension.
5.3 Neglecting String Stretching
Neglecting string stretching is a mistake that can lead to tuning instability and poor playability. When new strings are installed, they naturally stretch as they settle into the guitar’s setup. If not stretched properly, they will continue to stretch over time, causing frequent tuning adjustments and inconsistent pitch. To avoid this, manually stretch each string by gently pulling it away from the fretboard and then tuning it again. Repeat this process until the string holds its pitch steadily. Failing to stretch strings can result in higher action and a less responsive playing experience. Regular stretching ensures stability and optimal performance, making it a crucial step in the setup process.
Telecaster-Specific String Recommendations
Telecaster players often prefer strings that enhance brightness and clarity. Medium-light gauges (9-42 or 10-46) are popular for balanced playability. Nickel-wound strings offer a vintage tone, while steel-wound options provide a brighter sound. Many players opt for strings designed specifically for Telecasters to complement their signature twang and versatility across genres.
6.1 Best Strings for Electric Telecasters
For electric Telecasters, the best strings are those that enhance the guitar’s signature brightness and snap. Medium-light gauges (9-42 or 10-46) are ideal for most players, offering balanced playability and tone. Nickel-plated steel strings, such as those from Fender or Ernie Ball, deliver a classic, vintage Telecaster sound with warm highs and strong midrange. For a brighter, more aggressive tone, stainless steel or titanium strings are excellent choices. Many players also prefer coated strings for reduced finger noise and longer lifespan. When selecting, consider your playing style and musical genre to find the perfect match for your electric Telecaster’s unique voice.
6.2 Best Strings for Acoustic-Style Telecasters
For acoustic-style Telecasters, the optimal string choice balances warmth, clarity, and playability. Medium-light gauges, such as 10-47 or 11-52, are often preferred, offering a smooth feel without compromising on tone. Phosphor bronze strings are highly recommended, as they provide a warm, balanced sound that complements the Telecaster’s natural brightness. Brands like D’Addario, Elixir, and Ernie Ball offer excellent options, with Elixir’s Nanoweb coating being a great choice for durability and ease of play. These strings enhance the guitar’s midrange and sustain, making them ideal for both fingerstyle and strumming techniques. They ensure a vibrant yet mellow tone, perfect for capturing the essence of an acoustic-style Telecaster;
Advanced String Setup Techniques
Advanced techniques include custom gauges for specific tones and alternative tunings. Experimenting with gauges like 9-42 or 10-46 can enhance playability and tonal consistency. Exploring drop D or open G tunings expands musical versatility, while precise string spacing ensures optimal performance and prevents buzzing. These methods allow players to tailor their Telecaster’s sound and feel to suit advanced playing styles and genres.
7.1 Custom String Gauges
Custom string gauges allow players to tailor their Telecaster’s sound and playability to specific needs. By mixing light and heavy strings, musicians can achieve balanced tension and tone. For example, pairing lighter high strings (e.g., 0.009-0.042) with heavier low strings (e.g., 0.052-0.060) can enhance clarity and sustain. Jazz players often prefer heavier gauges for warmer tones, while rock musicians opt for lighter strings for bending ease. Experimenting with custom gauges requires adjusting bridge and nut setups for proper tuning stability. This approach enables precise control over string response, making it ideal for advanced players seeking unique sonic and tactile experiences. Always test gauges gradually to avoid sudden changes in tension.
7.2 Alternative Tunings
Alternative tunings can unlock new sonic possibilities for Telecaster players. Tunings like open G, open D, or drop D simplify playing chords and riffs in lower registers. Some artists use tunings like CGCGCE for unique textures. Experimenting with alternative tunings requires adjusting string gauges and setups to maintain playability. Heavier strings may be needed for lower tunings to avoid floppiness. Lighter strings work better for higher tunings to prevent excessive tension. Always tune carefully and check string stability. Alternative tunings expand creative options, making the Telecaster versatile for various genres and styles. They challenge traditional playing techniques, encouraging innovation and experimentation in music-making.

Maintenance and Upkeep of Strings
Regularly cleaning and inspecting Telecaster strings maintains tone and playability. Wipe strings after use and store the guitar in a dry place. Schedule changes every 3-4 months.
8.1 Cleaning Strings
Cleaning your Telecaster strings regularly is essential for maintaining tone and preventing corrosion. Use a soft, dry cloth to wipe down each string, focusing on the areas where your fingers make contact. For deeper cleaning, apply a small amount of guitar string cleaner to the cloth and gently rub the strings in a lengthwise motion. Avoid using harsh chemicals or excessive moisture, as they can damage the strings or the guitar’s finish. Clean the fretboard and bridge area as well to remove dirt and oils. Regular cleaning after each use will extend the life of your strings and keep your Telecaster sounding its best. For heavily corroded strings, consider replacing them promptly to maintain playability and tone quality.

8.2 Replacing Strings
Replacing strings on your Telecaster is crucial for maintaining optimal tone and playability. Old strings can become dull, corroded, or prone to tuning issues. Start by removing the old strings one at a time to avoid bridge or neck instability. Install the new string, ensuring it’s the correct gauge and type for your guitar. Thread the string through the bridge and tuning machine, leaving a small loop at the bridge end for proper seating. Wind the string tightly and evenly, avoiding overlaps. Stretch each string by gently tugging it away from the fretboard to set the tuning. Repeat for all strings and tune your guitar thoroughly. Regular replacement ensures consistent tone and prevents string breakage during performance.

Proper string setup and maintenance are essential for optimal Telecaster performance. By following these guidelines, you’ll achieve superior tone, playability, and longevity of your strings.
9.1 Final Tips for Optimal Playability
To achieve the best playability on your Telecaster, ensure your strings are in excellent condition and properly tuned. Regularly check and adjust the action to avoid buzzing or difficulty in pressing strings. Proper intonation is crucial, so verify it periodically. Stretching new strings thoroughly will stabilize tuning. Using the right pick and maintaining good playing technique will enhance your overall experience. Lastly, keep your guitar clean and store it in a stable environment to preserve string life and performance. By following these tips, you’ll enjoy a smoother, more responsive playing experience with your Telecaster.
9.2 Encouragement to Experiment

Experimenting with your Telecaster strings is key to unlocking your unique sound. Don’t hesitate to try different gauges, materials, or winding types to discover what suits your playing style. Alternative tunings can also breathe new life into your music. Consider exploring drop tunings, open chords, or even modal setups to expand your creative possibilities. Remember, every string change is an opportunity to refine your tone and technique. Embrace the process of trial and error—your Telecaster is a versatile instrument, and experimentation is the best way to maximize its potential. Keep exploring, and you’ll find the perfect setup to match your musical vision.